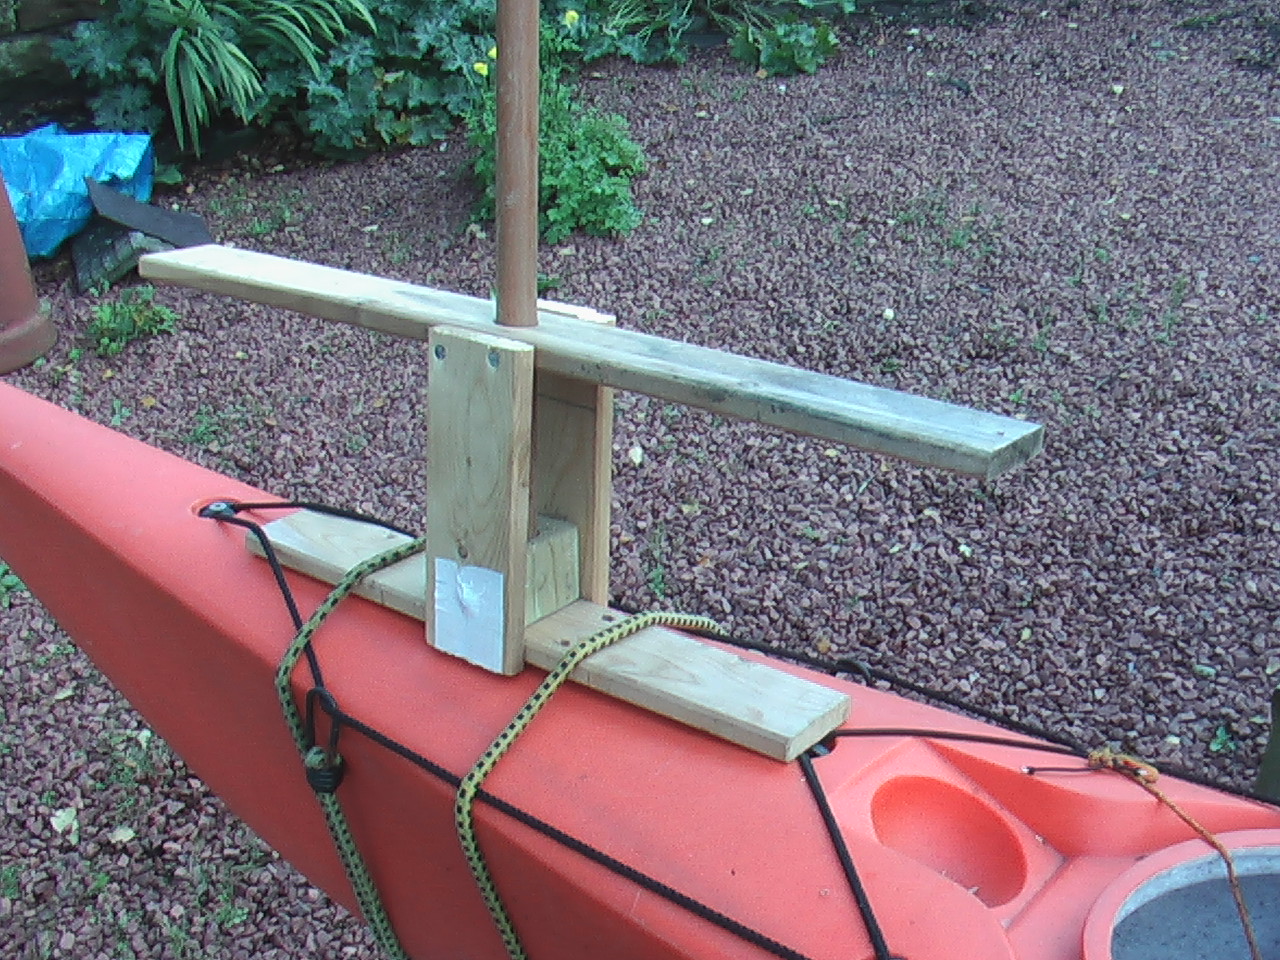
After making my new rig for my Capella Sea kayak, I set everything up in the garden to try it out in a light breeze.
The mast needed supported with bunji straps to take the strain fore and aft; also I noticed a block needed to be fixed in the center of the hull so the paddle will not hit the sheet.
The poly tarp sail is of a Bermudan style, and may need battens to help it have maximum efficiency.
In general, it worked well, probably not good to windward, but on a run, I think it will be enough to rest the arms and use the oar as a rudder. I will be using 'sponsons' either side of the cockpit for stability, and I may even fix a lee-board for upwind use.
Showing posts with label kayak. Show all posts
Showing posts with label kayak. Show all posts
Wednesday, March 21, 2012
Tuesday, February 7, 2012
Porto in Portugal
A recent trip to Aveiro in Portugal to attend an Organology Conference, we stayed in Porto and I was delighted in the overview of the city. Small streets line the banks of the river, an excellent river for kayaking from Spain which I will attempt later this year hopefully.
Porto has kept its old feel, small streets large enough to reach across and touch both walls.
The harbour showed a history in the stone, and boats were there now for touristy purposes, but it added to a charm of the place. The old traditional boats next to the old harbour walls.
Long oars were used to propel the boats, but they can not have been for sea voyaging on the Atlantic.
 Brightly painted sterns. We did not see any sails in use, but in the summer the boats are used for transporting tourists.
 Portugal is well known for its coloured tiles on the sides of houses and churches, and railways stations.

 |
| A view from the bridge onto old Porto |
 | |||
| Old Medieval Streets |
 |
| Old Harbour |


Thursday, January 26, 2012
Sail on Sea Kayak

Tuesday, October 18, 2011
Kayak Frame Completed
I am a firm believer in securing most things on a boat with rope instead of bolts and screws, rope gives a small amount of movement and is easily adjusted and replaced and is less wear on the hull.
 After choosing which frame to use I dispensed with the wood as much as possible to cut down on weight. I placed plastic tubing underneath the frame to give it a level foundation. I then secured the frame to the plastic tubing by way of drilling holes in the frame and tubing and tying it with a plastic line. I tied the tubing to the safety rope which runs along the kayak hull. The tubing is only to give the frame a steady base when heeling. I then
secured the frame to the hull by tying it down firmly with bunji. When
secured I pulled and tugged at the frame in different directions to
assimilate heeling, the kayak moved and the frame stayed secure.
After choosing which frame to use I dispensed with the wood as much as possible to cut down on weight. I placed plastic tubing underneath the frame to give it a level foundation. I then secured the frame to the plastic tubing by way of drilling holes in the frame and tubing and tying it with a plastic line. I tied the tubing to the safety rope which runs along the kayak hull. The tubing is only to give the frame a steady base when heeling. I then
secured the frame to the hull by tying it down firmly with bunji. When
secured I pulled and tugged at the frame in different directions to
assimilate heeling, the kayak moved and the frame stayed secure.
 Later, I secured the frame firmly to the hull with a better and more tighter strapping system. Also I inserted the mast and ran a line from the spreaders through the mast head and down to the other spreader this stopped the mast from falling out in a capsize. I pulled at the mast and the kayak moved but the frame stayed rigid. I felt satisfied the frame is ready for the sail.


Thursday, October 13, 2011
Kayak Rig: Work in Progress
The idea of drilling a hole in the deck to insert the mast is not an option for me. I prefer decks to be as water tight as possible. So the idea is to erect a frame on the hull so the mast can be set into it and left there while kayaking. Since the sail will be hoisted to the mast, it is the sail which will be taken down leaving the mast erect. I started by using the remnants of my previous attempts of a frame. This
wooden construction I used for the inflatable kayak but found it too
heavy, but it is sturdy enough for the plastic kayak. I screwed the
longer panel onto the top of the frame thus creating a 'box' like
construction with a hole cut for the mast to go into and a wooden base
with a hole drilled to insert the bottom of the mast.
The longer top section can be cut to size or left its length to use as
'spreders' if rope stays are to be added to keep the tension of the mast.
Now to choose where to fix the frame and in what position?
 I positioned the frame at cross-section to the kayak. Resting above the compass well did give it a balanced secure position.
 But with heeling I would have to make the base more secure than only bunji straps.
The next position I tried was to place the frame lengthwise to the kayak hull. This would give stability while Running with the wind, but it was not stable if the wind was beam on.
 By placing strips of wood underneath the frame it gave a stronger and sturdier foundation the frame to rest upon the hull. The lengths could by cut to size later flush with the deck. Foam or rubber could be placed underneath these cross-sections to make it plush with the hull to stop the frame from moving.
 The next position I tried was similar to the first with the frame at a cross-section to the hull but this time I added a 'V' shaped construction to strengthen the stability when on a Run. This position gave full contact with the hull and added to the strength of the frame.
 This is the one I will probably use..but it is early days yet.
Now to choose where to fix the frame and in what position?


The next position I tried was to place the frame lengthwise to the kayak hull. This would give stability while Running with the wind, but it was not stable if the wind was beam on.


Tuesday, October 11, 2011
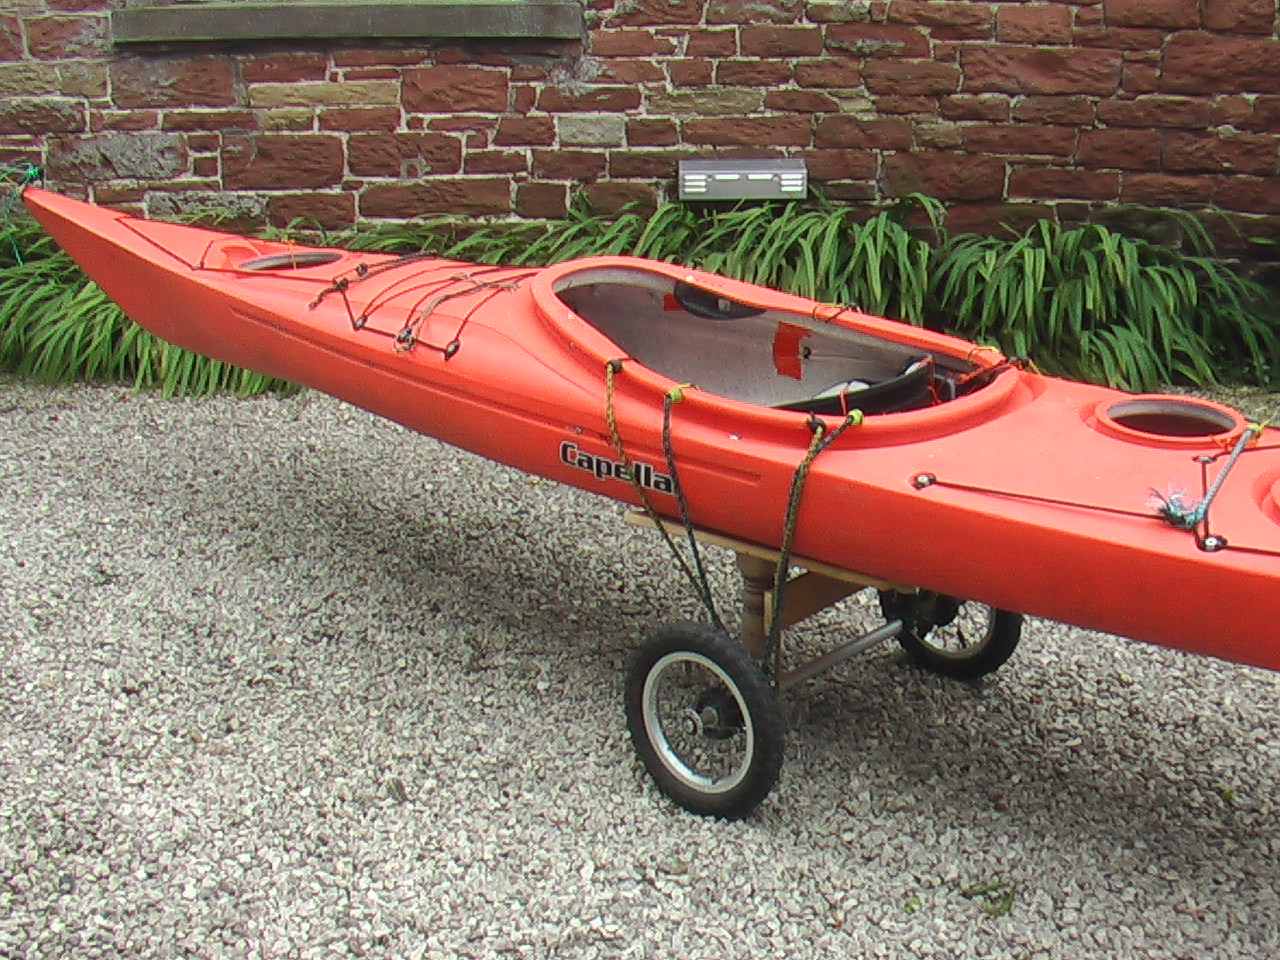
New Sea Kayak Wheels
As the previous wheels were too heavy and unstable I decided to make my own frame by turning wood and using the axle of the pram. I cut the joints at an angle so the boards, that the kayak hull will rest upon, sit even. I then fastened another piece of wood to strengthen the 2 legs. I up-turned the kayak positioned the frame and bunji strapped it onto the hull.

After some adjustment I tied it to the bike and positioned the frame in the centre of the kayak, it sat balanced without much weight on the bike frame. I gave it a test run for about 1 mile and it ran very well, it bounced less than before and felt sturdy.Turned easily and did not pull to much going up hill.

I will do a test run to the sea soon and if that is successful I will design another Crab-Claw rig for the kayak.

After some adjustment I tied it to the bike and positioned the frame in the centre of the kayak, it sat balanced without much weight on the bike frame. I gave it a test run for about 1 mile and it ran very well, it bounced less than before and felt sturdy.Turned easily and did not pull to much going up hill.
I will do a test run to the sea soon and if that is successful I will design another Crab-Claw rig for the kayak.
Wednesday, October 5, 2011
New Wheels for Kayak
It has been over 3 years since I got out the P&H Sea Kayak, the last time was my 4 day journey from Kippford to Gamelsby (Scotland to England). Then I bought my Hurley Felicity and I have been sailing and redesigning her rig (documented in this blog). But now I am turning my thoughts to sea kayaking once more. Partly to do with keeping fit and partly to do with transportation. I wish to see other shores that the Solway Coast and I am not getting out far enough with the Hurley due to our strong winds that we have had for the past few years. Also another factor is I added a sailing rig to my inflatable kayak and this worked fine so I am now thinking to add one to my Capella sea kayak and explore the coast line closer. In a few weeks I will be taking down the mast on the Hurley and mooring her for the winter so the Capella will be in use once more.
Since I can transport the 16ft sea kayak by bike I have been making a new frame for her and I got hold of a good set of wheels which turn well due to ball bearings in the axle. This will make it alot easier to transport by bike to the coast.
I got the whole frame today and I have been thinking what bits to cut off and what to keep. i think i will take most of it off and keep only the back axle and turn some wood so it can be slotted into the axle base. From this I can add bits to support the hull of the kayak.
 The problem with the frame was the height and the weight, it was too high off the ground and able to tip over in high winds, also the whole weight was too much to store.

Tuesday, May 31, 2011
Testing my Kayaksailing Rig in a Force 4
The 2nd day was more lively. The wind had re-turned blowing about a Force 4, it was strong enough to test the rig and to make the incoming tide choppy. I desided to go in an anti-clockwise direction around the harbour walls so I would get an all point sailing direction, for the rig and wind; with a reach and a run, tacking and gybing. Some areas were calmer than others, by the mouth of the harbour it was quite a race. The rig gybed without any problems, it did not heel me too much and even in the thick of it I was not knocked off balance. On one tack it worked well but on the other it was less efficient, but this is true with all sailing rigs. I was still using the sail as an aid to paddling not a sailing rig in its own right. It gave me a feeling of an 'added paddler', and certainly made my paddling a lot easier and increased my speed, but I could now by how much. Very please with the results in such conditions. I could change the sheets with my new cleats and sheets, positioning them so I could get at them easily and even with the wind pushing me off course I could sheet in the sail or let it out with out fumbling for the cleat. Works best on a run.
New Trials with the Improved Kayaksail Rig
I was waiting for a good day to test my new Crab-claw kayak sailing rig. I had made some new changes since my 1st attempt. I got rid of the wooden frame as it was too heavy to carry, and I made a simpler construction out of plastic tubing. It was a lot easier to assembly and the purchase of new cleats and sheets made the whole process a lot easier and enjoyable.
The gales had gone leaving very little wind which eventually died away to nothing. I got up early morning to meet the tide and enjoyed a good time following the tide down to Drumbrugh where I noticed the banks errosion from the tide on the English side (they joke "Scotland is getting bigger as England gets smaller).
The wind died and the rain came, I paddled past Port Carlisle down to Bowness-on-Solway with the ebb and pushed against the ebb to get back to Port Carlisle. Not an exciting morning but it was very enjoyable and gave me the confidence to know that the rig was ok and in working order. The rig was easier to set up and although there was not much wind she performned well and did as she should. I still was using a Leeboard put my paddle for directional control, it works fine for this rig/kayak. When the wind gets too strong I paddle into the wind and cleat in hard. The sail does not flap around and she does not heel me, so in a way it is like reefing.
Monday, May 2, 2011
Redesigning Kayak Rig
After a delightful time in Spain, I came home with pits and pieces to add to my inflatable kayak rig...4mm chord, cleats etc. to make it more efficient and safer while on the water. By adding these bits I slowly began to modify it more, in the end I completely re-did the structure. I built a frame for the mast to fit into; I re-drilled the bottom and top cross beams and added a thicker wooden mast higher than previous; I widened the cross beams to I can add a 3ft leeboard and strengthened it with an extra piece of wood for the tube to sit upon as it holds the leeboard. The mast and the yard are telescopic so I can reduce their size when travelling. The cleats I fixed to a plank of wood that extends underneath the seat, my body pressure keeps the plank/cleats firmly fixed, and yet I can remove them when not in use/travelling. I fixed pulleys and the sail hoisted very easily and I could cleat it off effortlessly and quickly. The wind was very strong gale force winds blew the sail about as I experimented, without paying attention the boom jibed and caught me on the side of the temple, luckily I was in my garden and not out at sea, it was a wake-up call and I will remember to watch the boom in future. I will replace the boom with a lighter material.
The picture is the newly constructed frame and mast, with leeboard down the side of the kayak.

The picture is the newly constructed frame and mast, with leeboard down the side of the kayak.

Monday, April 25, 2011
First Sail with the Crab-Claw Rig Kayak
This is the video of my first trip with the Gumotex inflatable kayak on the Solway Estuary using the design of the Polynesian catamaran rig. There is less stress on the boat in a jibe and easily erected and carried.
Thursday, January 28, 2010
Dreams of the Sea
I have been dreaming the past few nights about kayaking. I have absorbed myself with sailing in the past year, buying a boat and learning to sail, equipping her for short journeys; so I have neglected kayaking, and like a jealous lover She is angry and she keeps me awake at night with her love and need of attention. I was never ´introduced´ to kayaking by anyone, I bought my sea-kayak before i ever sat in one. I fell in love with the idea of kayaking, it was my transport, instead of the road my traveling companion was the boat, and the motorways of the world the tide. I am not a river person, although I love all types of water, my affection is for the sea as it is a real lover - dangerous, forever changing, supportive, constant, beautiful and unpredictable. I spent the winter of 2005 searching for my kayak and when I bought her I paddled her the first day in the small river next to my house. I capsized of course and trapped her between the two banks of the river as she was too long to turn, the water flooded into the cockpit and I had to jump out in freezing water and pull her around before she snapped in two. The next journey was from that same river down to the sea. I thought it would take a few hours but it took me all through the night and by 5am I had reached the sea and saw the dawn greet me and I slept by the incoming tide. In the years that i have kayaked I seen many dawns, and many beautiful places that I would not have seen otherwise, kayaking is a window to the world and a new atlas to open. So it is time I started kayaking again and revisit those times that were alone but not lonely.
(The music to this video was played by myself and friends, myself on mandolin)
(The music to this video was played by myself and friends, myself on mandolin)
Subscribe to:
Posts (Atom)